Amazon Lightsail: Continuous Deployment to its Container Service With GitHub Actions

Container services1 have been around for a while, but they are not cheap for starter applications where you want to experiment with an idea. Amazon Lightsail provides this convenience and affordability for only $7, allowing you to provision a Nano-sized container, but the bottleneck is how to keep this updated whenever you want release a new version of your application.
In this article, I will show you how to automate deploying to Amazon Lightsail continuously using GitHub Actions. The traditional way to update your existing container service was through the AWS CLI, pointing to a new version of your private docker image.

That sucks. Especially if you make changes to your application frequently and you have more than two engineers on your team. I strongly believe in automating mundane tasks, and with GitHub Actions, you can achieve Continuous Deployment.2
Setup
You will need to have:
- a GitHub Account.
- a Docker Hub Account.
- a Amazon Web Services (AWS) Account.
- an existing Node.js service.
- an understanding of npm and package.json file.
- an understanding of GitHub Actions, Containers specifically Docker and Amazon Web Services.
- Coffee.
I assume your:
- Node.js service uses PostgreSQL Database.
- Node.js service uses Jest for unit or integration tests.
- AWS account has IAM credentials specifically for CI/CD.
- Docker Hub account has an auth token specifically for CI/CD.
I suggest the following project layout below because it’s organized and provides a single place to bootstrap your service, tests, and configuration. I’ll just be explaining the important bits of this structure in the configure section, but you can mail me for a better understanding of this layout.
/Users/akinjide/service-hello

  ├── package-lock.json
  ├── package.json
  ├── README.md
  ├── .gitignore
  ├── .dockerignore (+)
  ├── .github (+)
  │   └── workflows
  │       └── workflow.yml
  ├── config
  ├── coverage
  ├── docker (+)
  │   ├── Dockerfile
  │   └── docker-entrypoint.sh
  ├── src
  │   ├── modules
  │   ├── libs
  │   ├── services
  │   ├── database
  │   ├── main.js
  │   └── app.js
  ├── build
  └── test
      ├── unit
      └── integration
- (+): folders and files that will be added in the configure section.
Configure
Docker
Docker is a set of platform as a service (PaaS) products that use OS-level virtualization to deliver software in packages called containers. Containers3 are isolated from one another and bundle their own software, libraries, and configuration files; they can communicate with each other through well-defined channels.
Add a .dockerignore file to your Node.js project.
$ touch .dockerignore
The .dockerignore file will inform docker to ignore the folders and files listed.
node_modules/
*.log
.idea
.DS_Store
build/
coverage/
.github
Add a Dockerfile and docker-entrypoint.sh file to the docker folder in your Node.js project. This will allow Docker to build your service into an image and executable with the script in docker-entrypoint.sh
$ mkdir docker
$ touch docker/Dockerfile
$ touch docker/docker-entrypoint.sh
The Dockerfile is a multi-stage build that uses Docker base image Node 14.17-alphine and proceeds with installing your project dependencies, copying, and building your source code.
# syntax=docker/dockerfile:experimental
# Stage "base": build main docker environment for any node.js application
ARG NODE_VERSION=14.17-alpine
FROM node:${NODE_VERSION} as base

# Install your global runtime dependencies here that are required for service to operate
# Example: RUN apk add --update g++ make

COPY docker/docker-entrypoint.sh /usr/local/bin/docker-entrypoint.sh
RUN chmod +x /usr/local/bin/docker-entrypoint.sh
WORKDIR /home/node/app/

# Stage "build": Install your build dependencies here (e.g those that are required only at a build time when doing npm install)
FROM base AS build
RUN apk add --update build-base python

# Stage "dependencies": Build node_modules and put it into stage docker layer cache
FROM build AS dependencies
COPY package.json package-lock.json /home/node/app/
RUN npm ci

# Stage "release": Copy node_modules and from docker layer cache and update application source code
FROM base AS release
COPY --from=dependencies /home/node/app/node_modules ./node_modules
COPY . /home/node/app/

RUN npm run build

ENTRYPOINT [ "docker-entrypoint.sh" ]
The docker-entrypoint.sh file contains executable scripts that instruct Docker on how to start your service or perform certain actions with the source code.
#!/bin/sh

if [ $# -eq 0 ]; then
  exec node build/main.js
else
  exec "$@"
fi

exit $?
Amazon Lightsail
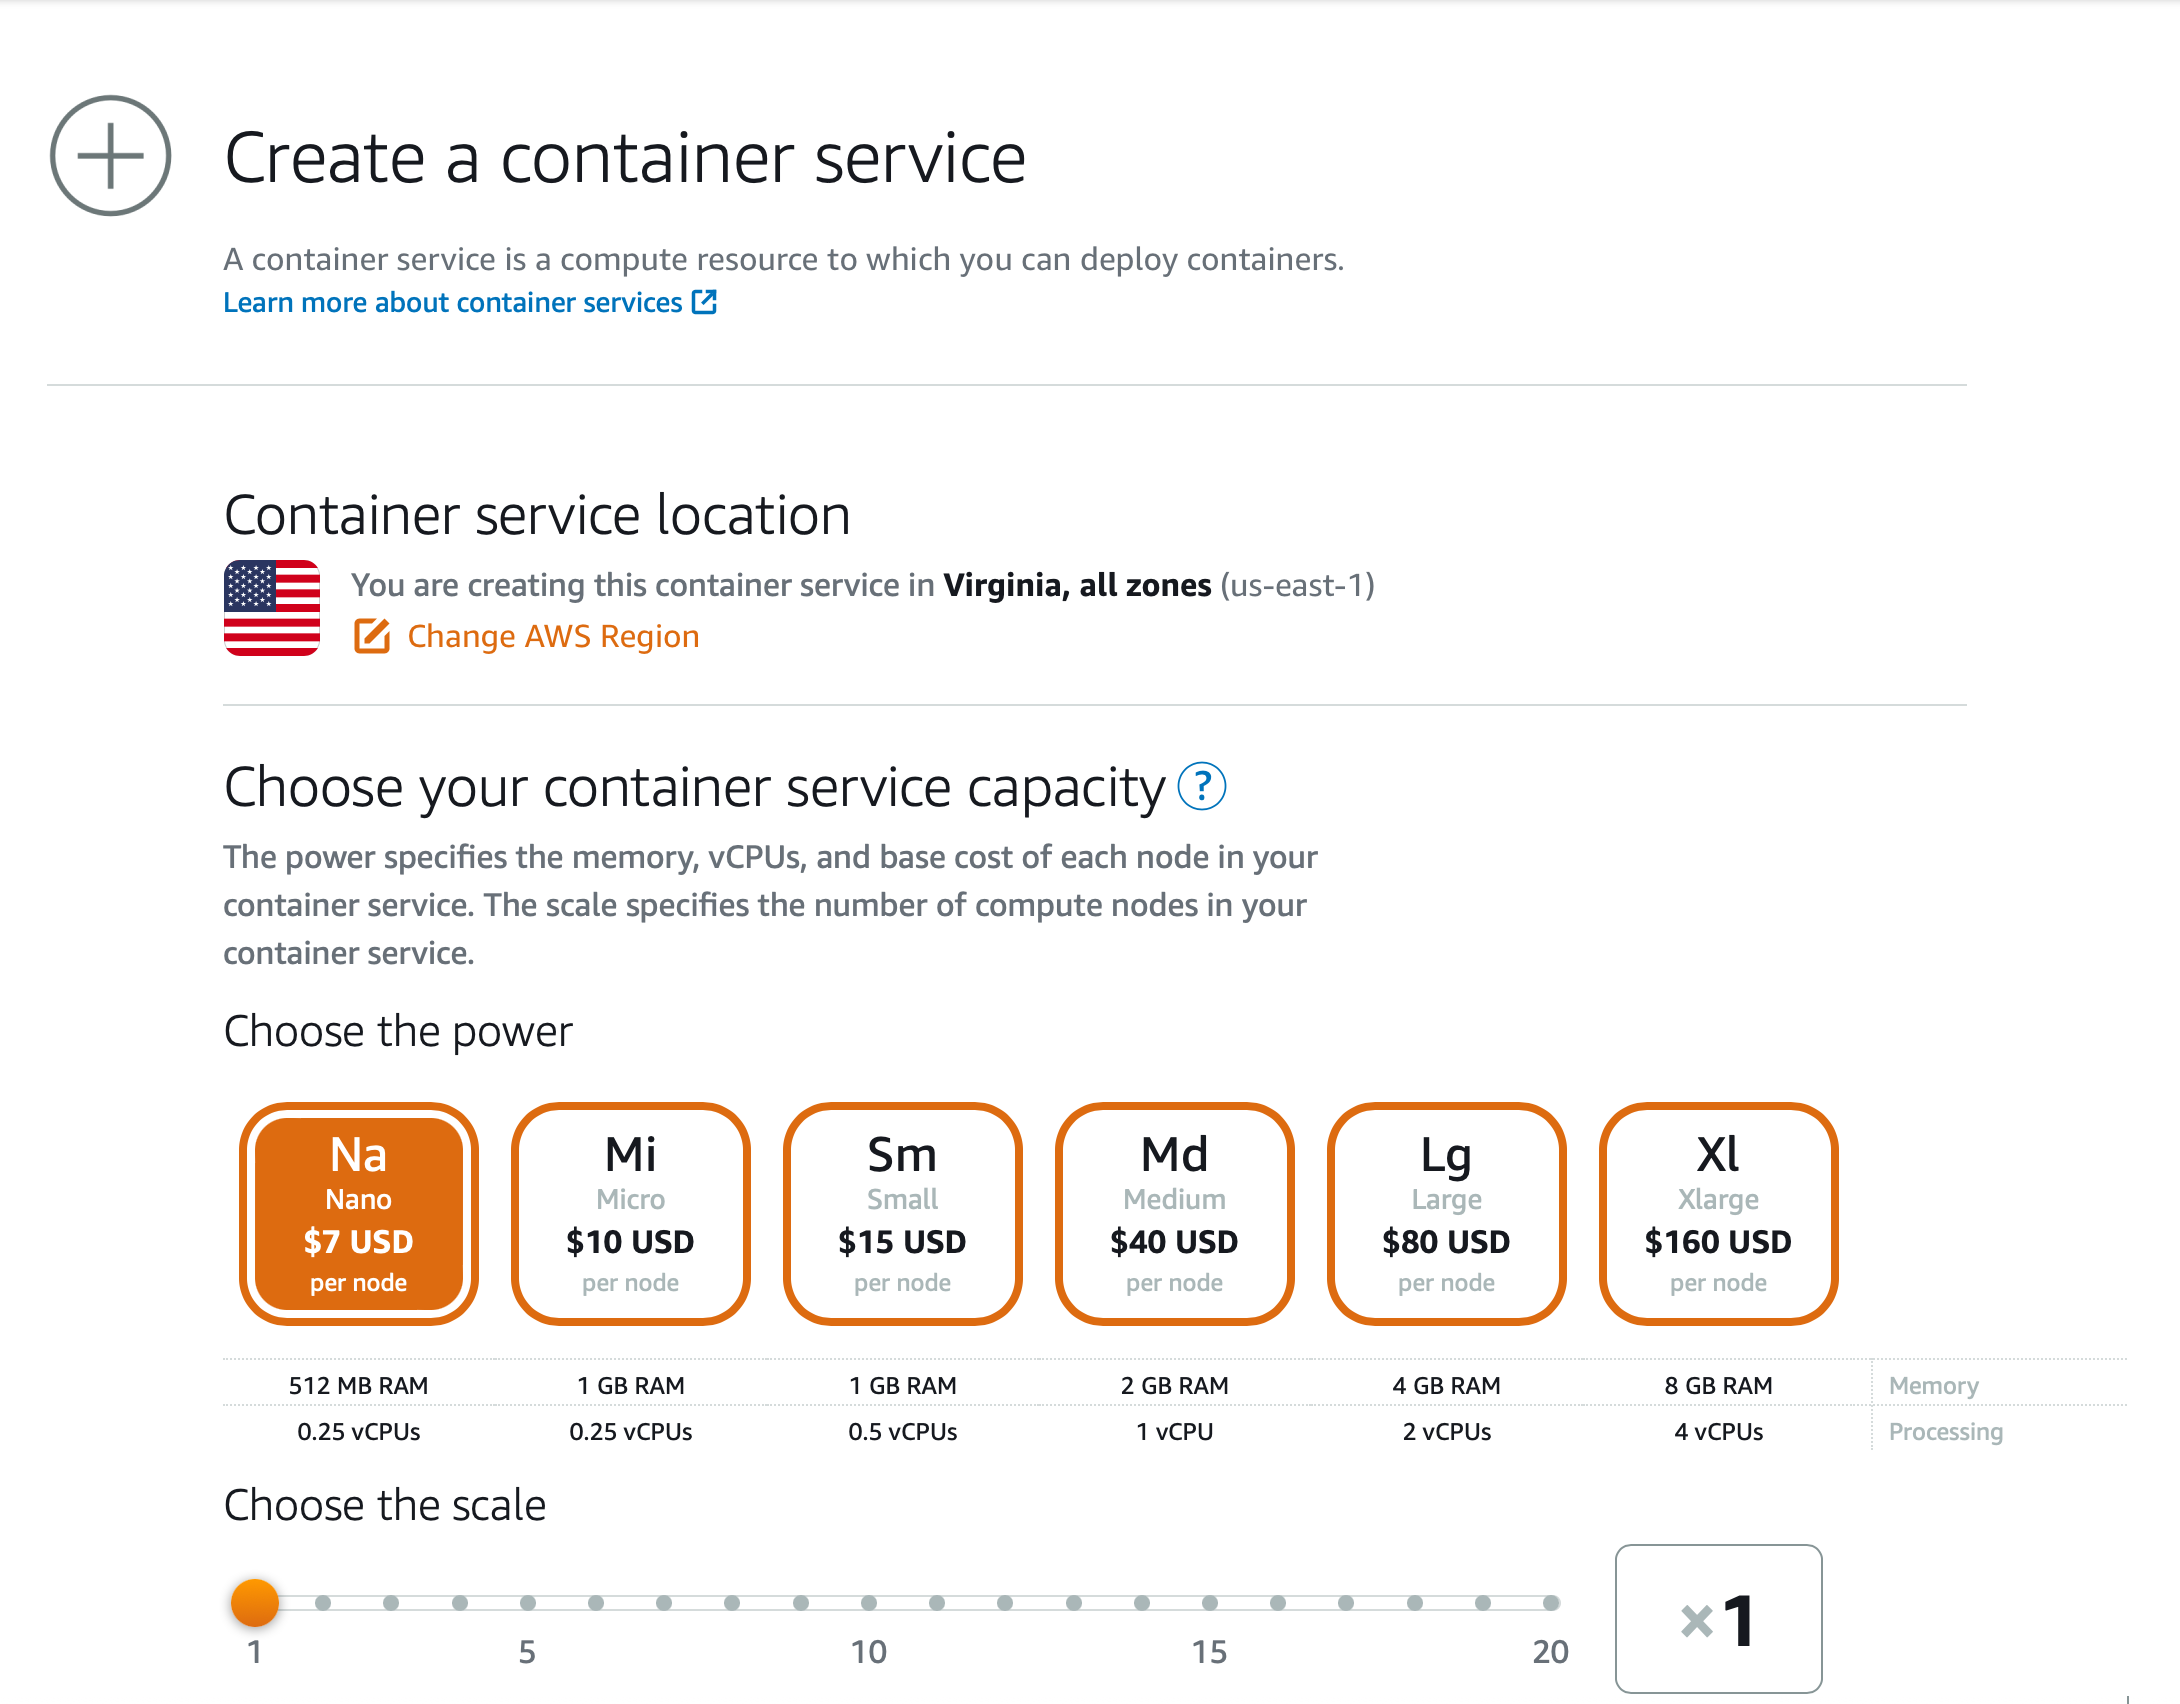
Amazon Lightsail is the easiest and cheapest way to get started with Amazon Web Services (AWS). For just $7, you can get a 512MB and 0.25vCPU node, which is enough to power a small-scale service or web application.

I will show its container services only, but I assume you are connecting to its managed PostgreSQL database.

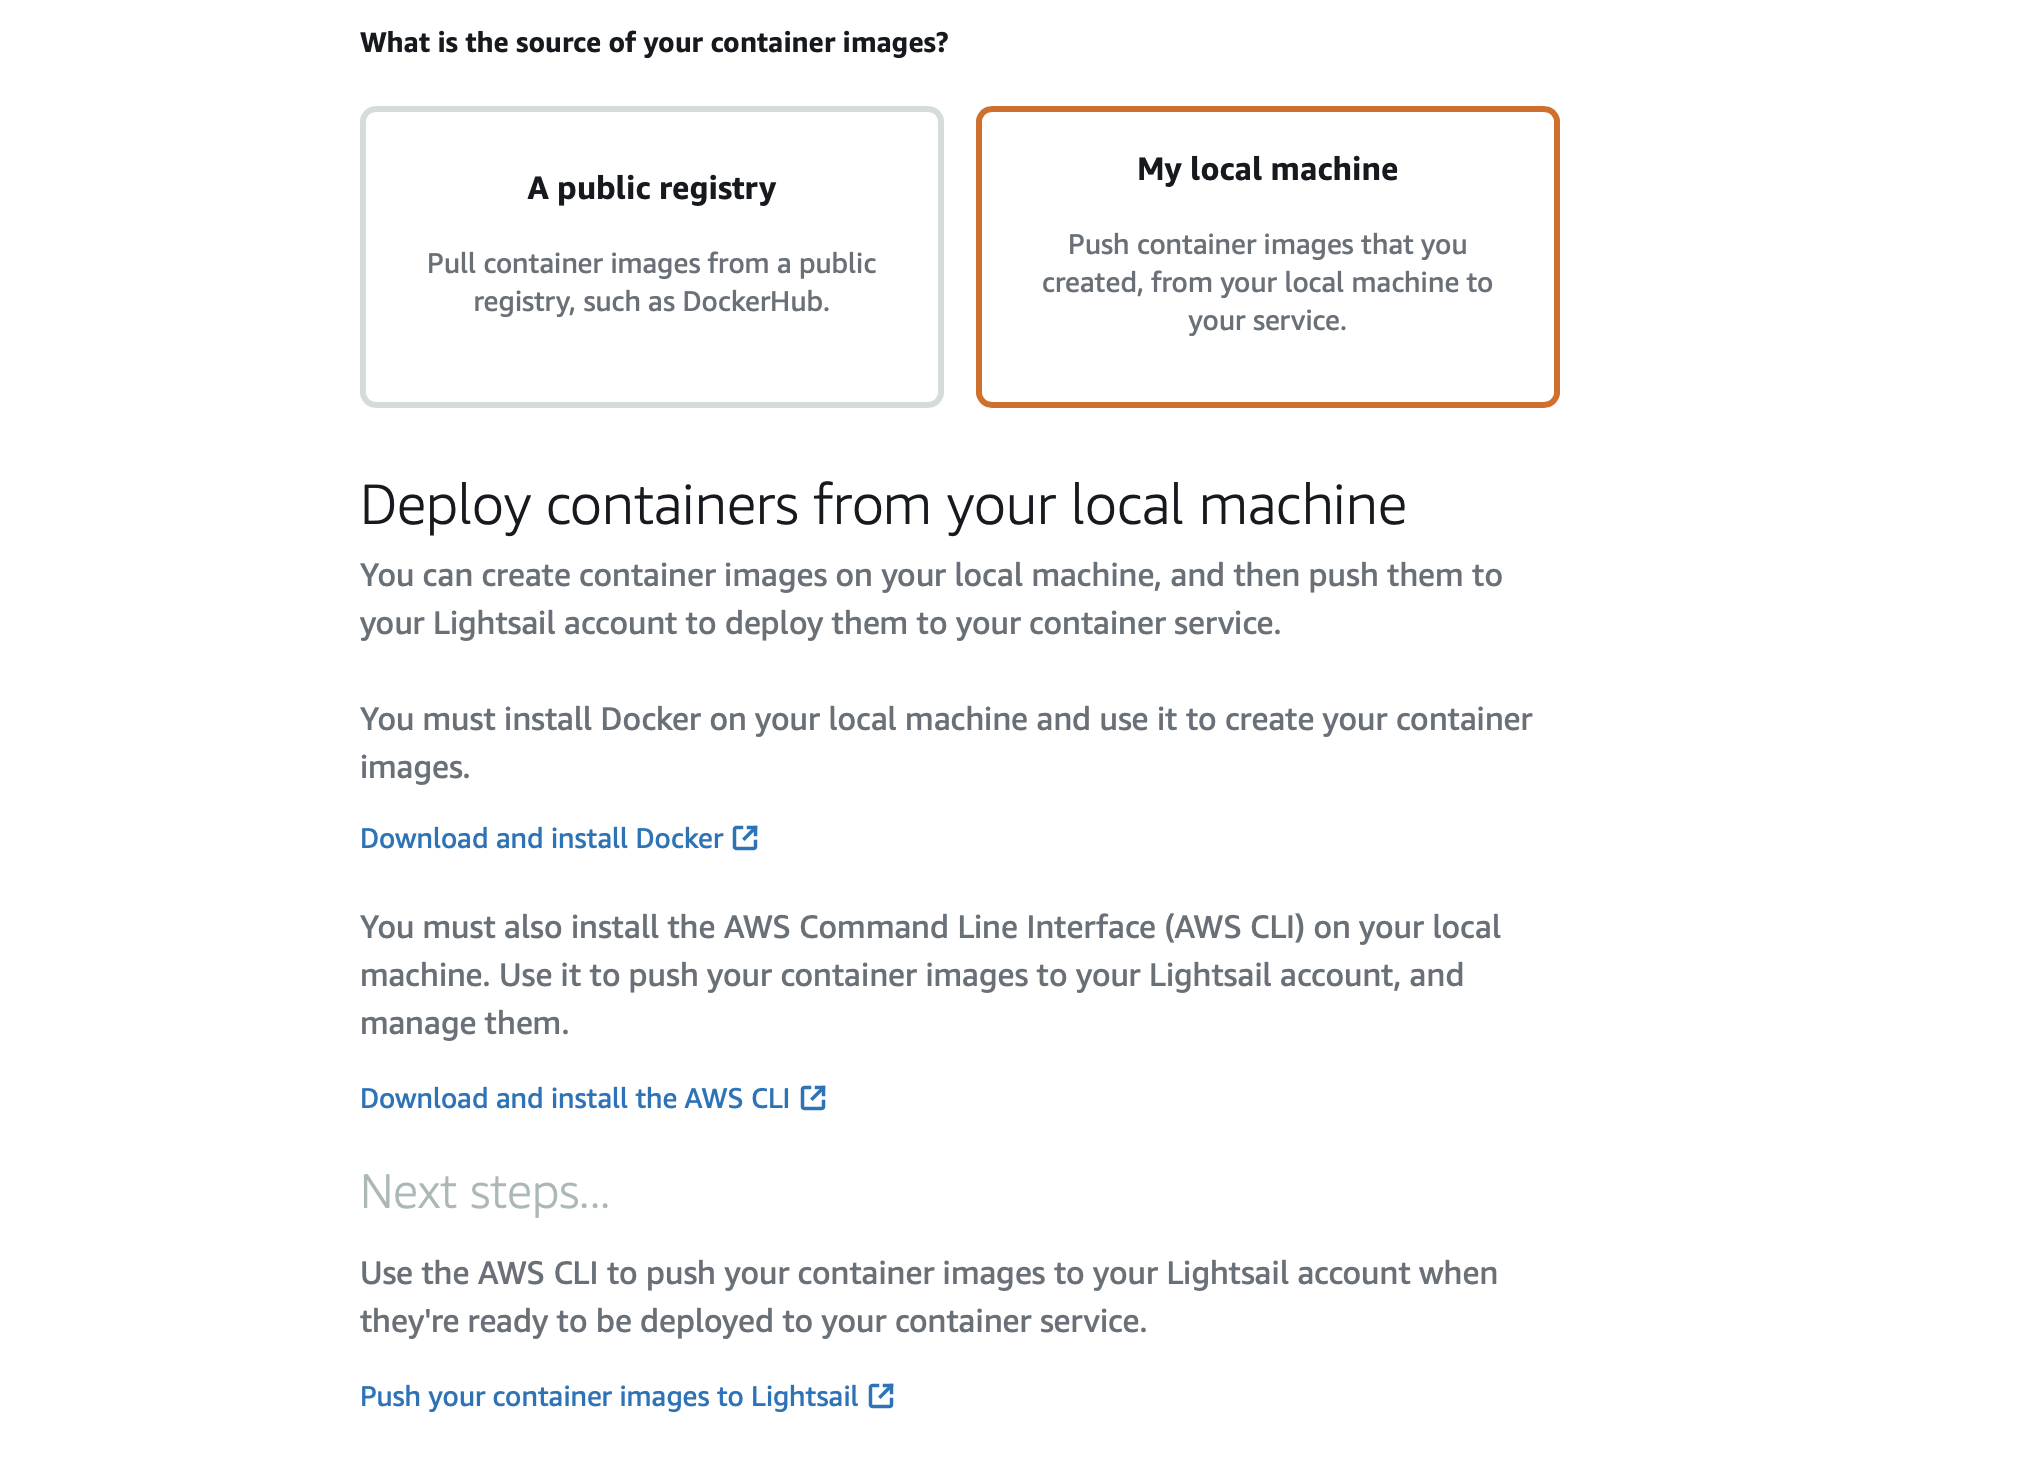
Follow the steps below to create a new container service in any region of your choice.
- Container service location: us-east-1. You can change to a region closer to you.
- Power: Nano, $7 USD per node. You can change to higher if you prefer.
- Scale: 1. You can choose to have more than one copy of the Nano node if you prefer.
- Deployment: Skip. We will automatically deploy with GitHub Actions.
- Identify Service: service-hello. Change to an appropriate service name which will be included in the final domain for your container service.
After completing the steps above, you can click “Create container service” and wait a few minutes for the provision to be completed.
npm Scripts
npm scripts are used to automate common repetitive tasks without the need for tools or external task runners like Gulp. I assume you have an existing package.json file, so you can include the test, build, and docker:build commands.
{
  "scripts": {
    "test": "NODE_ENV=test jest --runInBand --detectOpenHandles",
    "build": "babel src --extensions '.js' --out-dir build --verbose --no-comments",
    "docker:build": "docker build -f docker/Dockerfile -t ${npm_package_name}:latest .",
  }
}
- Test command will execute the unit or integration tests defined in your Node.js project.
- Build command will transpile next generation JavaScript to support JavaScript in your Node.js engine.
- docker:build command will run the build command and generate a docker image that will be deployed to Docker Hub.
You might have other npm scripts commands in your package.json, but nothing we included should conflict with your existing commands.
GitHub Actions
GitHub Actions make it easy to build, test, and deploy your source code from your code repository. I definitely like the simplicity, workflow triggers (like on release and on push) and existing actions, which make workflows customizable.
Add a workflow.yml file into the .github workflows folder in your Node.js project. This will allow GitHub CI to build your source code and deploy it to Amazon Lightsail.
$ mkdir -p .github/workflows
$ touch .github/workflows/workflow.yml

The workflow.yml contains crucial steps to accomplish automatic deployment to Amazon Lightsail and assumes your service depends on a PostgreSQL database. If otherwise, you can see GitHub Actions setup instructions for other databases.
Follow the steps below to customize this workflow file to suit your needs.
- GitHub Action Trigger: The workflow will only be triggered when you publish a new release on the repository. You can change to other triggers like “push” or “manually”.
- SERVICE_NAME: Change to your service name but note it will be prefixed with “service-” (e.g.
service-hello). - DOCKER_USERNAME: Change to the username you use with Docker Hub, which will allow CLI login, pull, and push.
- GitHub Secrets: Set the below secrets in your repository and GitHub Actions will automatically use them. I recommend generating new AWS IAM credentials
- DOCKER_AUTH_TOKEN: Your Docker Hub auth token can be gotten from your Account settings.
- AWS_ACCESS_KEY_ID: Your dedicated AWS IAM CLI access key ID.
- AWS_SECRET_ACCESS_KEY: Your dedicated AWS IAM CLI secret access key.
- code coverage: You can remove this job step if you are not generating code coverage after executing your tests.
- containerPort: Production services should generally be exposed on port 80 but you can change the port to match whatever you have configured for your service.
- healthcheck: If you have a healthcheck endpoint configured, you can replace the path and increase the
intervalSeconds. Refer to the Amazon Lightsail documentation for additional healthcheck settings. - environment: You can add more environment variables4 necessary for your service alongside NODE_ENV.
name: build_and_deploy_service

on:
  release:
    types:
      - published

env:
  NODE_ENV: "test"
  SERVICE_NAME: "hello"
  DOCKER_USERNAME: "akinjide"

jobs:
  build-service:
    runs-on: ubuntu-latest
    services:
      postgres:
        image: postgres
        env:
          POSTGRES_USER: "postgres"
          POSTGRES_DB: "postgres"
          POSTGRES_HOST_AUTH_METHOD: "trust"
          options: >-
            --health-cmd pg_isready
            --health-interval 10s
            --health-timeout 5s
            --health-retries 5
        ports:
          - 5432:5432

    steps:
      - name: checkout
        uses: actions/checkout@v2
        with:
          ref: ${{ github.head_ref }}
      - name: restore_or_save_cache
        uses: actions/cache@v2
        with:
          path: ~/.npm
          key: ${{ runner.os }}-v1-dependencies-${{ hashFiles('**/package-lock.json') }}
          restore-keys: |
                        ${{ runner.os }}-v1-dependencies-
      - run: npm ci
      - name: Run tests
        run: npm test
        env:
          NODE_ENV: ${{ env.NODE_ENV }}
          DATABASE_URL: "postgres://postgres@localhost:5432/postgres"
      - name: code coverage
        uses: actions/upload-artifact@v2
        with:
          name: code_coverage_report
          path: coverage
          retention-days: 5
      - name: Build vars
        id: vars
        run: |
          sudo npm i -g .
          echo "::set-output name=image::${{ env.DOCKER_USERNAME }}/${{ env.SERVICE_NAME }}:$GITHUB_SHA"
          echo "::set-output name=latest::${{ env.DOCKER_USERNAME }}/${{ env.SERVICE_NAME }}:latest"
      - name: Build Docker image
        run: npm run docker:build -- -t ${{ steps.vars.outputs.image }} -t ${{ steps.vars.outputs.latest }}
      - name: Login to DockerHub
        run: |
          echo "Authenticating docker.io"
          echo ${{ secrets.DOCKER_AUTH_TOKEN }} | docker login --username=${{ env.DOCKER_USERNAME }} --password-stdin
      - name: Push to DockerHub
        run: |
          docker push ${{ steps.vars.outputs.image }}
          docker push ${{ steps.vars.outputs.latest }}

    outputs:
      image: ${{ steps.vars.outputs.image }}
      latest: ${{ steps.vars.outputs.latest }}

  deploy-service-production:
    needs: [build-service]
    runs-on: ubuntu-latest
    steps:
      - name: prereqs
        env:
          AWS_ACCESS_KEY_ID: ${{ secrets.AWS_ACCESS_KEY_ID }}
          AWS_SECRET_ACCESS_KEY: ${{ secrets.AWS_SECRET_ACCESS_KEY }}
          AWS_DEFAULT_REGION: 'us-east-1'
        run: |
          aws configure set aws_access_key_id $AWS_ACCESS_KEY_ID
          aws configure set aws_secret_access_key $AWS_SECRET_ACCESS_KEY
          aws configure set default.region $AWS_DEFAULT_REGION
          aws configure set region $AWS_DEFAULT_REGION
          cat ~/.aws/credentials
      - name: Install essentials
        run: |
          aws --version

          # install LightsailCTL Plugin (https://lightsail.aws.amazon.com/ls/docs/en_us/articles/amazon-lightsail-install-software)
          sudo apt-get update && sudo apt-get -y install curl jq
          curl https://s3.us-west-2.amazonaws.com/lightsailctl/latest/linux-amd64/lightsailctl -o /usr/local/bin/lightsailctl
          chmod +x /usr/local/bin/lightsailctl
      - name: Release to Amazon Lightsail
        env:
          CONTAINER_SERVICE_NAME: service-${{ env.SERVICE_NAME }}
        run: |
          echo "Releasing to Amazon Lightsail"

          docker info
          echo ${{ secrets.DOCKER_AUTH_TOKEN }} | docker login --username=${{ env.DOCKER_USERNAME }} --password-stdin
          docker pull ${{ needs.build-service.outputs.image }}

          # upload the docker image for this pipeline
          aws lightsail push-container-image \
            --service-name $CONTAINER_SERVICE_NAME  \
            --label ${{ env.SERVICE_NAME }}-latest  \
            --image ${{ needs.build-service.outputs.image }}

          # get uploaded image (its different every time)
          IMAGE_TAG=$(aws lightsail get-container-images --service $CONTAINER_SERVICE_NAME | jq -r .containerImages[0].image)

          # create a deployment with uploaded docker image
          aws lightsail create-container-service-deployment \
            --service-name $CONTAINER_SERVICE_NAME \
            --containers "{
              \"$CONTAINER_SERVICE_NAME\": {
                \"image\": \"$IMAGE_TAG\",
                \"environment\": {
                  \"NODE_ENV\": \"production\",
                  \"PGSSLMODE\": \"no-verify\"
                },
                \"ports\": {
                  \"80\": \"HTTP\"
                }
              }
            }" \
            --public-endpoint "{
              \"containerName\": \"$CONTAINER_SERVICE_NAME\",
              \"containerPort\": 80,
              \"healthCheck\": {
                \"path\": \"/healthcheck/liveness\",
                \"intervalSeconds\": 10
              }
            }"
Build and Deploy
Build

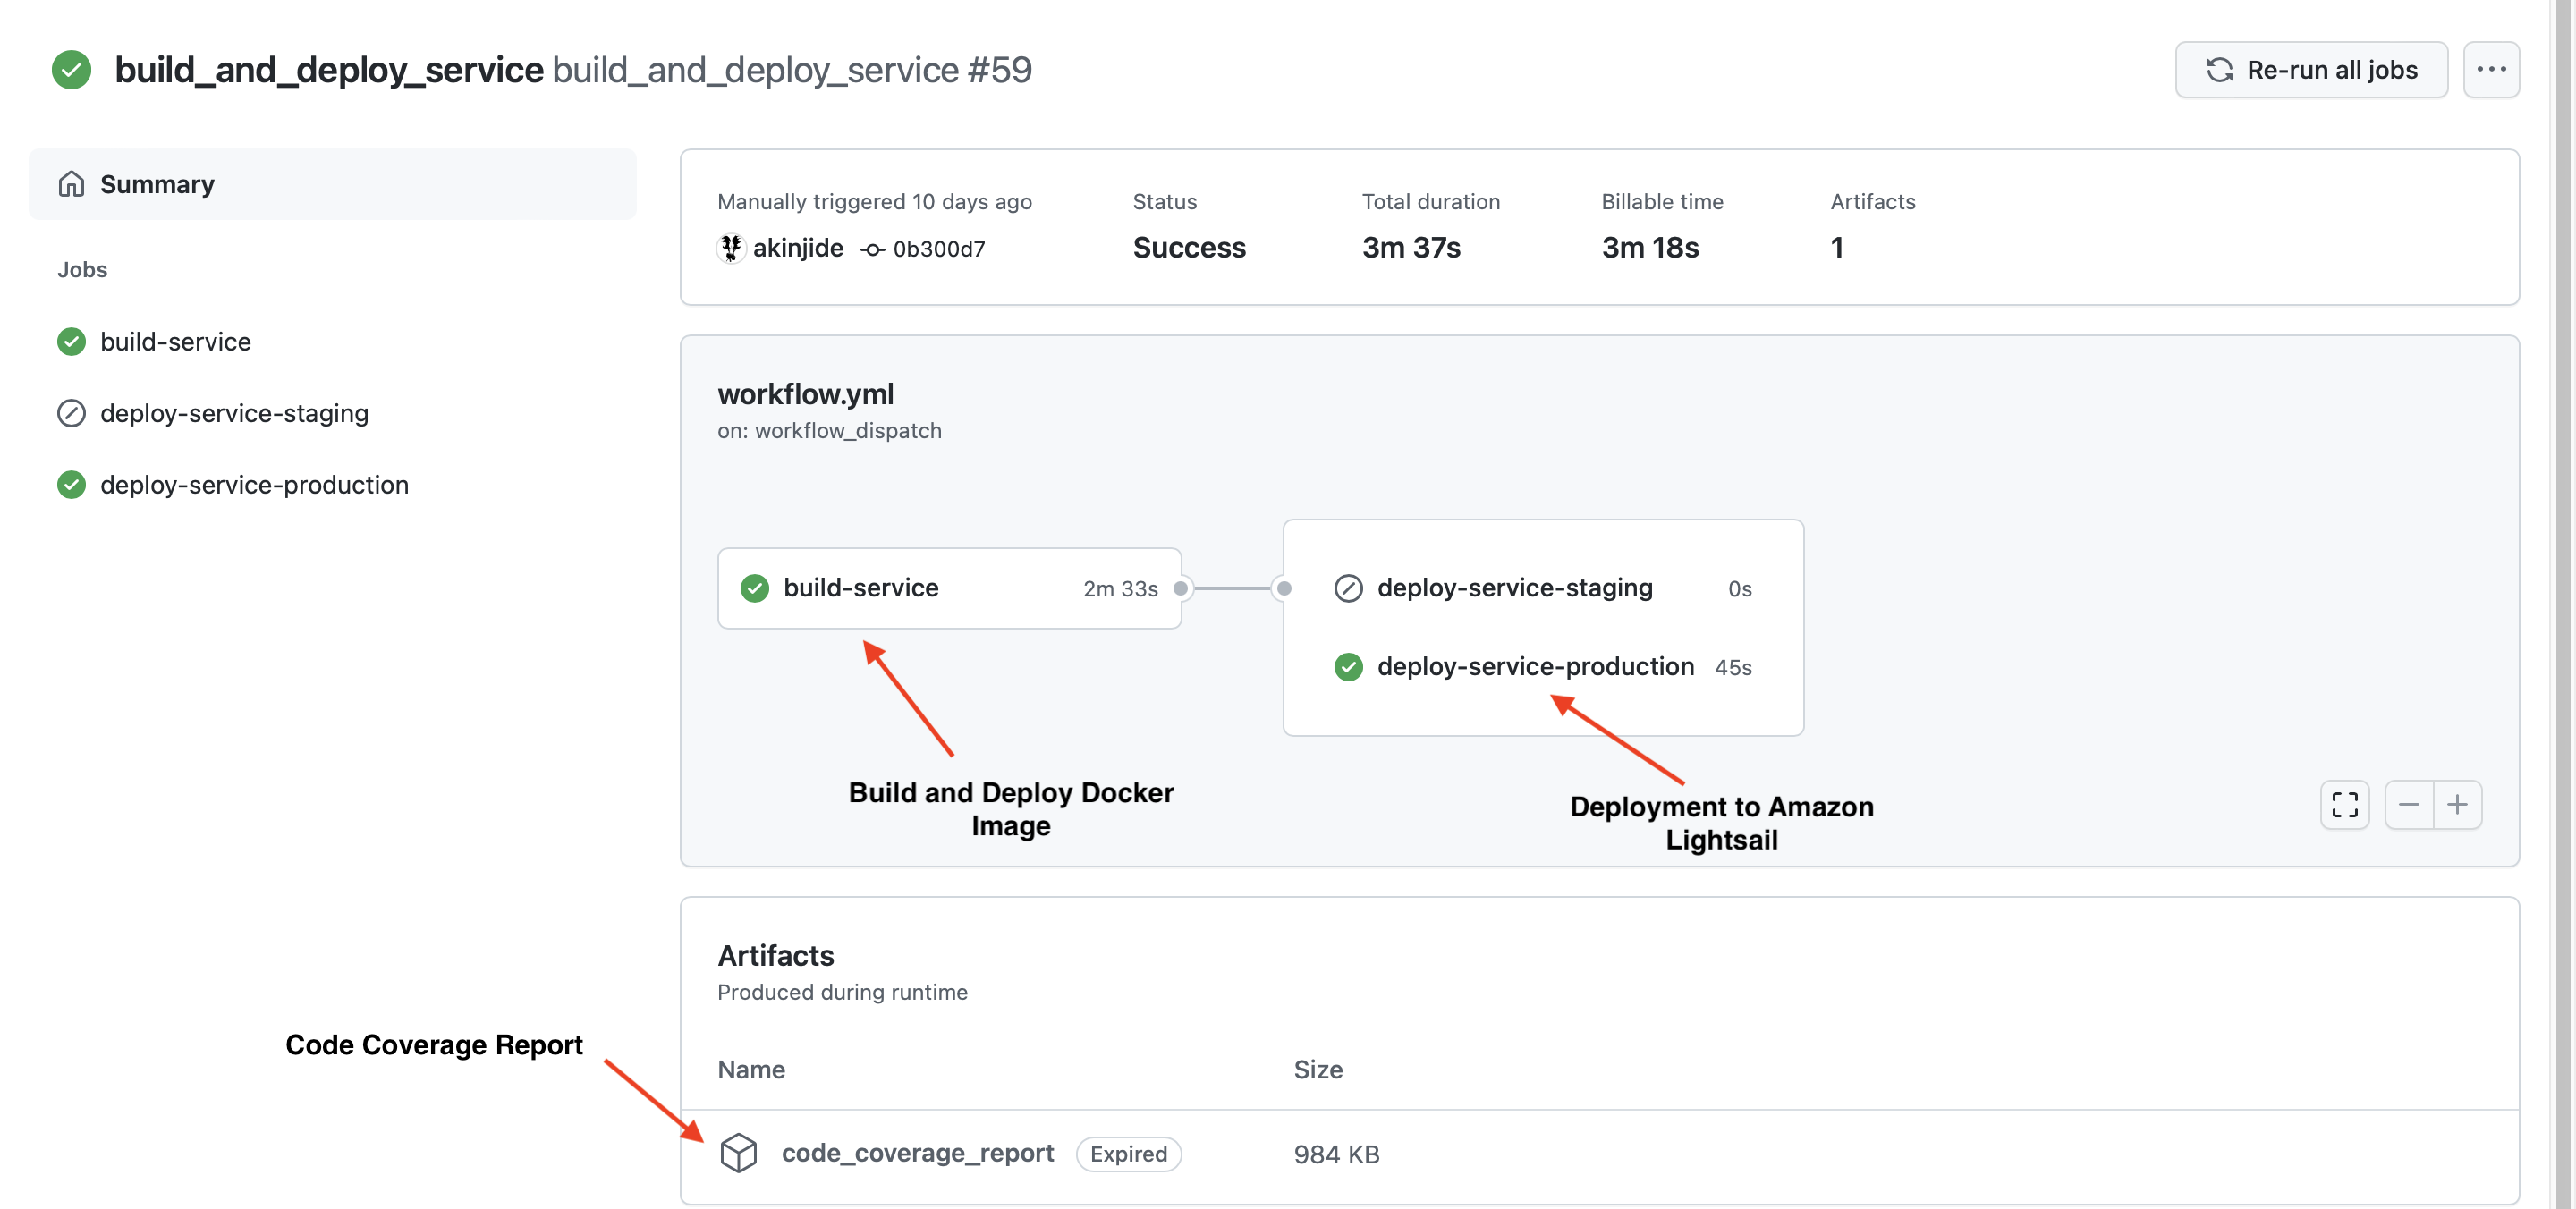
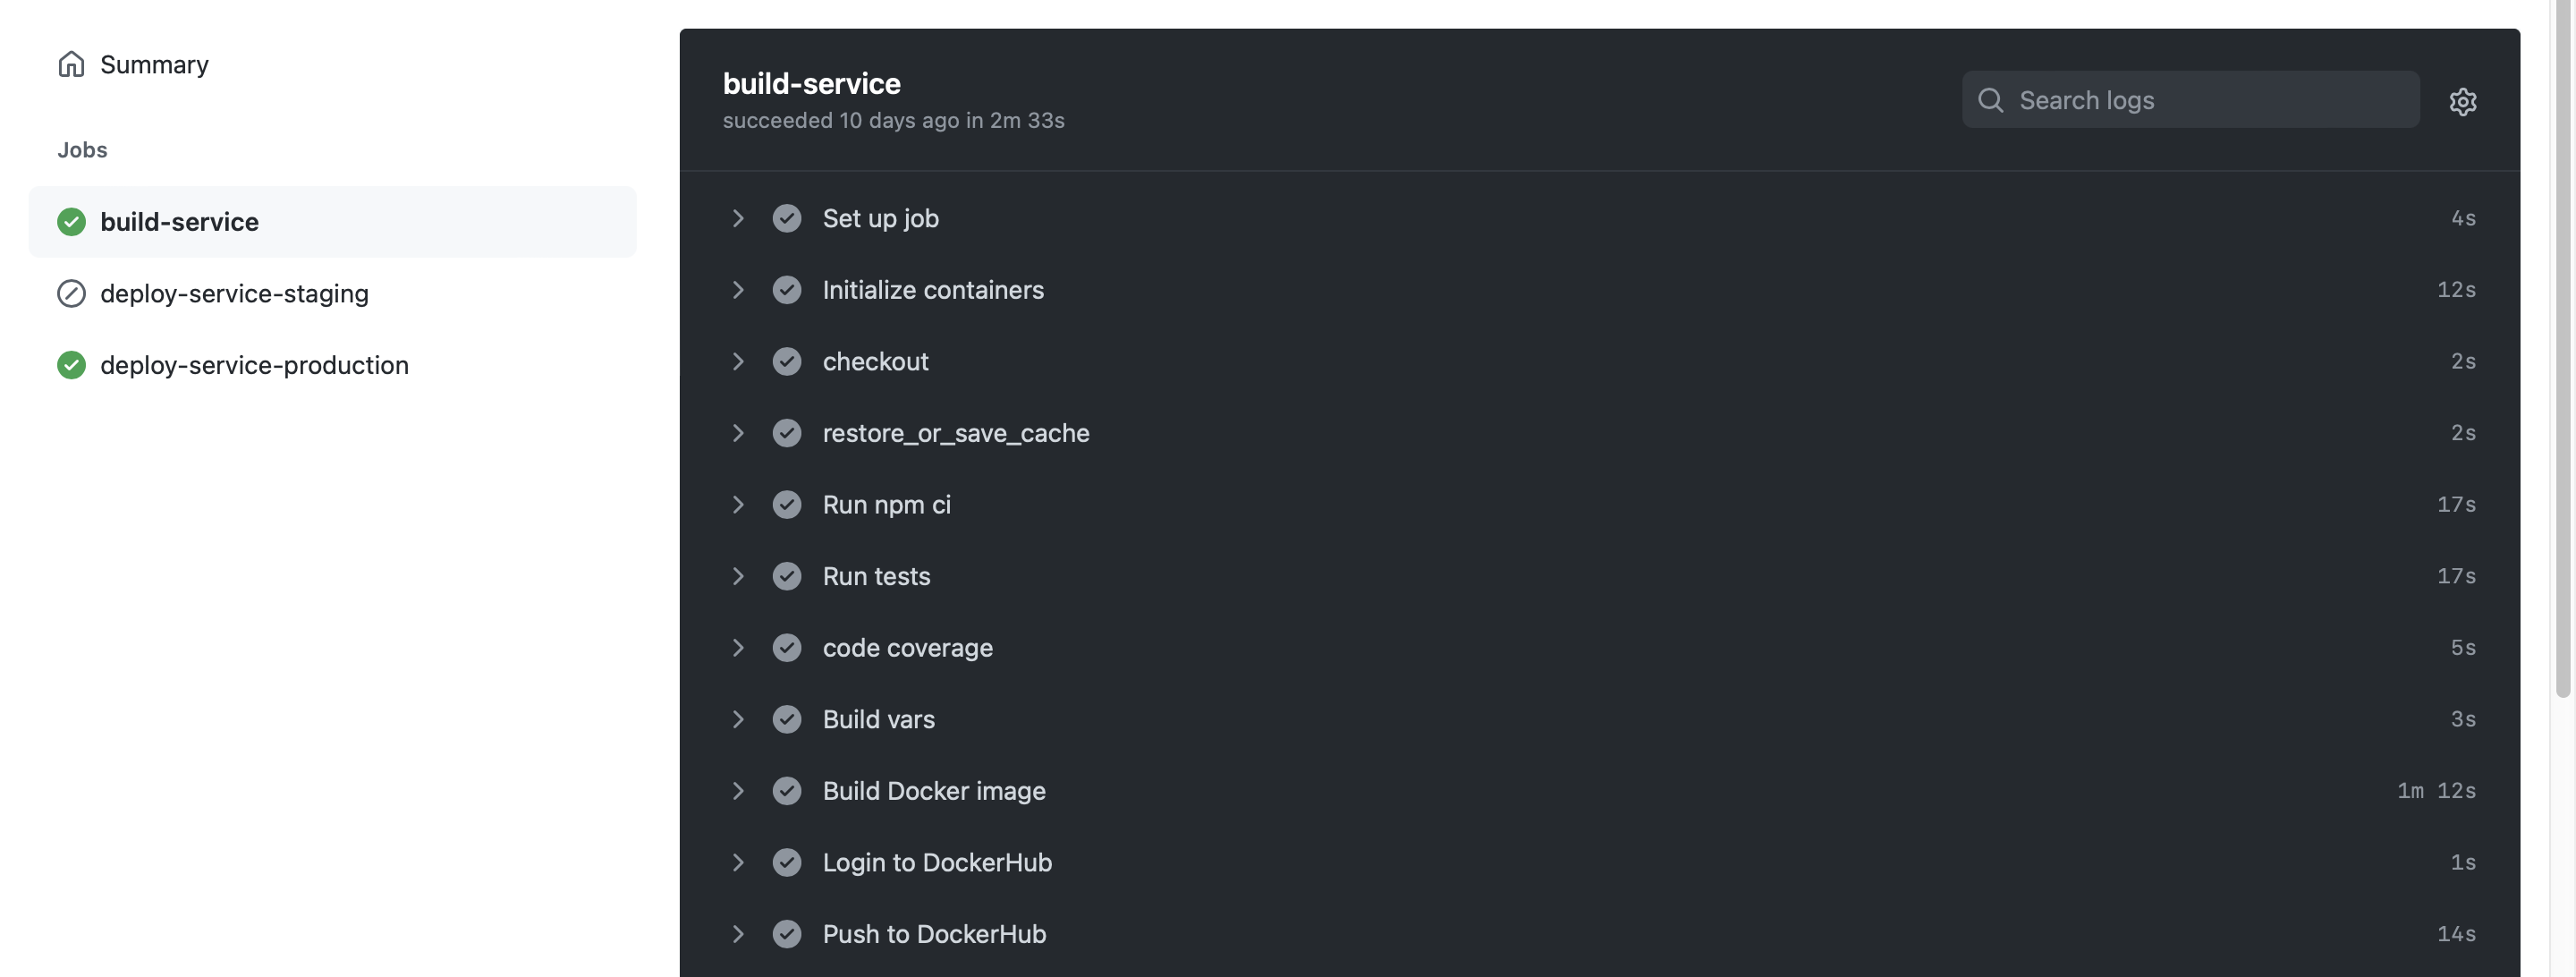
With the GitHub Action workflow.yml configured, you will be able to review the build-service job steps and debug any step that fails. However, you shouldn’t have any failed steps if your workflow file is configured correctly and Docker credentials are valid.
Deploy

The deploy-service-production job should be triggered automatically after build-service executes and exits successfully. If the deployment fails, you can always debug the failed step. However, you shouldn’t have any failed steps if you have setup Amazon Lightsail in us-east-1 and your AWS CLI credentials are valid.

After a successful deploy, you can visit your healthcheck endpoint with the public domain address provided when you created the Lightsail container service (.e.g. service-hello.<random-guid>.us-east-1.cs.amazonlightsail.com)
curl -X -I GET service-hello.<random-guid>.us-east-1.cs.amazonlightsail.com/healthcheck/liveness

HTTP/2 200
date: Sun, 19 Dec 2021 12:14:12 GMT
content-type: application/json
content-length: 78
vary: Accept-Encoding
x-connection-id: 4258a7ad-b58c-4a97-b566-14b27d57eb0b
Final Thoughts
If you have followed the Setup and Configure section above precisely, you should have setup the Continuous Deployment successfully, and a subsequent published release on GitHub will trigger a build and deploy to Amazon Lightsail. I recommend extending this GitHub workflow to include:
- another job
deploy-service-<staging|preprod>which deploys to a staging or pre-production environment for testing before moving to production. - an approval step, so you can trigger the deployment when you desire, but be aware that this requires upgrading your GitHub account.
Mail me if you have questions? I will be happy to help.
-
Container services are cloud-based services that allows software engineers to push, run, scale, and manage containers by using container-based virtualization. ↩︎
-
Continuous Deployment relies on infrastructure that automates steps leading to deploying validated features into production environment. ↩︎
-
A container virtualizes the underlying OS and causes the containerized app to perceive that it has the OS — including CPU, memory, file storage, and network connections. ↩︎
-
An environment variable is a named-value field that affect running processes in a system or software behaviour. ↩︎
PS: If you read this far, you might want to follow me on GitHub, or subscribe via RSS above for updates.